Setting Sound Files
IndexKey Open Rails Trigger Events for Sounds
Introduction
If you wish to provide any feedback on this page, please use the contact page. It would be great to have some feedback, as this helps to ensure the accuracy of the information.
Sound File Basics
Files Required
To set up a train with functional sounds the following files will be required:
Locomotives - there are two sound files that are used for the configuration of sounds for a locomotive,
Tenders and Wagon - Wagons (freight wagons, passenger coaches or tenders) also have their own
Sound file location
Typically each piece of rolling stock (locomotive or wagon, etc.) has its own folder in the
Naming Conventions
Where the
Where a common sound folder structure is used (for example, "common_sounds"), it will be necessary to provide a path that OR can follow to find the files, such as
Sound File Format
Below is a description how the
Overall SMS Format
Typically the overall format of the
SIMISA@@@@@@@@@@JINX0x1t______
Tr_SMS (
ScalabiltyGroup( 5
Activation ( CabCam () Distance (100) )
Deactivation ( ExternalCam () PassengerCam () Distance (100) )
Stereo ()
Streams ( 2
Stream (
Skip ( **** Air Horn **** )
Priority ( 6 )
Triggers ( 2
Discrete_Trigger ( 8 StartLoopRelease ( 1 File ( "2tonsAirhorn.wav" -1 ) SelectionMethod ( SequentialSelection ) ) )
Discrete_Trigger ( 9 ReleaseLoopRelease () )
)
)
Stream (
Skip ( **** bell **** )
Priority ( 6 )
Volume ( 0.9 )
Triggers ( 2
Discrete_Trigger ( 10 StartLoopRelease ( 1 File ( "bell1.wav" -1 ) SelectionMethod ( SequentialSelection ) ) )
Discrete_Trigger ( 11 ReleaseLoopRelease () )
)
FrequencyCurve(
SpeedControlled
CurvePoints ( 7 etc. etc.
)
)
)
)
)
)
The following points should be noted about the above format:
1. The SMS file container ( "head and tail part ).
2. Every sound or 'sound function' is included within an appropriate Stream.
3. Every Stream has his triggers (lines).
4. Optional frequency or volume curve settings.
5. It is important to ensure that all the "brackets" are matched, otherwise incorrect operation may occur.
The components of the above
SMS File "Header" and "Tail" Structure
The
SIMISA@@@@@@@@@@JINX0x1t______
The "tail" structure is enclosed within the Tr_SMS ( ) statement. Typically the "tail" is structured with a number of subsections, and is contained within the Tr_SMS statement, as follows:
Tr_SMS (
( The contents of the ScalibilityGroups are described hereafter )
)
The key sub-sections of the above overall file structure are described in more detail in the following sections.
Comments
Comments can be added to the
Skip ( text )
Comment ( text )
_( text )
It is strongly recommended that lots of comments are used in the
ScalibilityGroup
The
The ScalabiltyGroup section takes the following form:
ScalabiltyGroup( x
Activation ( y )
Deactivation ( y )
Stereo ()
( The contents of the Streams are described hereafter )
)
Where x = the number of the scalability group, commonly "5" is used in OR.
The lines Activation ( y ) and Deactivation ( y ) indicate within which view the sounds in this file are audible and at what maximum distance. The y value will be an appropriate combination of one or more of the following parameters.
Valid parameters are:
ExternalCam () - External Camera View (Keypress 2 3 4);
CabCam () - Camera within the cab (Keypress 1);
PassengerCam () - camera within the passenger view (Keypress 5);
Distance ( z ) - distance z (in metres) from the sound source that a sound can still be heard.
This is also when a
The difference between
Stereo ( ) - is not used in OR. However if in one Stream stereo .wav sound is used, never use mono .wav sounds in the same Stream.
Streams
Every sound or 'sound function' is included within an appropriate Stream command, which in turn are enclosed within the Streams command. A Stream also has 'a head and a tail', with various triggers that control the sound.
The "head and tail part" of a Stream consists of:
Streams ( 2
Stream (
Priority ( x )
Volume ( y )
( The contents of the Triggers are described hereafter )
)
)
The value Streams ( x is very important, as x indicates the number of Stream statements included. The function is simple, it indicates how many Stream ( are used in the respective file. [Remember the 's' !! Streams ( or Stream ( ]
Priority ( x ) - The "Priority" is necessary in a stream, but has no meaning in OR.
Volume ( y ) - The 'stream volume' can be adjusted by changing the y value. Valid values are between (0.0) = 0% to (1.0) = 100%. Although the advice is to leave everything at 100%, and give the correct volume of the
A Stream may have additional settings, such as the frequency or volume being changed depending on the speed or power. Practically this may be necessary for sounds like traction motors, turbo, diesel engine, etc. This is done by using the FrequencyCurve or VolumeCurve. (See examples in locomotive
Trigger
The triggers section has the following format:
Triggers ( x
( Each of the different Trigger statements has a slightly different format as described below )
)
where x = number of triggers to follow (This value must also be given exactly, because other errors occur and sounds do not function properly).
Each trigger line starts with "the type of trigger" as "if trigger is activated, do next". Think of a trigger as a one-time action or passing point! (never an "on / off function").
The following types of triggers are available to use:
Discrete_Trigger - this is a one-off trigger, and takes the form Discrete_Trigger ( x y ), where x = Trigger event, and y = Play Command. For example, if you press the Space bar to activate the "Horn" function, the discrete_trigger will only allow a one-off playing of the sound, even if you keep the Space bar is held pressed. (See the Table of Key Open Rails Trigger Events for Sounds for all discrete_triggers events).
Initial_Trigger - Actually "start with ...." and immediately start the relevant sound file. An Initial_Trigger is also often used to set other triggers "activated or deactivated" as a starting point. It takes the form of Initial_Trigger ( x ) where x = play command as described below.
Random_Trigger - This trigger is occasionally used to play a number of sounds, with intermediate pauses. It has its own structure. It takes the form of Random_Trigger ( x y ) where x = Delay_Min_Max ( a b ) Volume_Min_Max ( c d ), and y = play command as described below.
Dist_Travelled_Trigger - This trigger is rarely used, however it can be used to play a number of sounds per intermediate distance traveled. It has its own structure. It takes the form of Dist_Travelled_Trigger ( x y ) where x = Dist_Min_Max ( a b ) Volume_Min_Max ( c d ), and y = play command as described below.
Variable_Trigger - This trigger start when a certain 'variable value' is reached. It takes the form of Variable_Trigger ( x y ) where x = one of the variables described below, and y = play command as described below.
These variables include the following:
Speed_Inc_Past, Speed_Dec_Past, CurveForce_Inc_Past, CurveForce_Dec_Past, BrakeCyl_Inc_Past, BrakeCyl_Dec_Past, Distance_Inc_Past, Distance_Dec_Past, Variable1_Inc_Past, Variable1_Dec_Past, Variable2_Inc_Past, Variable2_Dec_Past, Variable3_Inc_Past, Variable3_Dec_Past.
Each of these parameters is typically written as Speed_Inc_Past ( x ) where x = a kind of % 'variable value', not a parameter such as km/h, Miles, etc. The 'variable value' can be tested and read during various circumstances via Sound Debug monitor in OR. It is suggested that a "simple route" with no objects, etc. is used for testing, such as the Coals to Newcastle test route. This is because the sound debug monitor requires a lot of performance.
The following sound triggers have also been defined for Duplex and Booster steam engines.
Variable1_2_Inc_Past, Variable1_3_Inc_Past, Variable1_4_Inc_Past, Variable1_2_Dec_Past, Variable1_3_Dec_Past, Variable1_4_Dec_Past, Variable2BoosterControlled.
where, Variable1_x (where x = engine number)
Play Commands
Play commands have the following format:
PlayCommand ( x y z )
where x= number of sound files, y = sound file name, and z = Selection Method.
The following types of play commands are available to use:
PlayOneShot - sound is played once.
StartLoopRelease - sound starts and played in a continuous loop from the first cue point to the last cue point.
ReleaseLoopReleaseWithJump - sound loop is stopped, typically grouped with the above play command. Only applies if the
StartLoop - sound starts and played in a continuous loop. As standard with
ReleaseLoopRelease - sound loop is stopped, typically grouped with the above play command.
SetStreamVolume - adjusts the Stream volume. Practically, you often use these as "on" and "off", so the value (1.0) = 100% and (0.0) = 0% respectively. This can be used if the trigger + sound is still playing in the background, but you want to mute the sound beforehand. Regarding volume of the sound in question, always try to make sure that the source
EnableTrigger - activates certain triggers (rules) within this stream. This means that a certain trigger (rule) may or may not work during certain moments in the simulator.
It is also often used to define dependencies, so chooses like if "trigger-1 is allowed to work when trigger 3 is activated". IOW, a kind of temporary "on / off buttons", depending on what activity you are doing during the simulator.
Again, the count is very important that it is filled in exactly. Also the 'reading order' from top to bottom, as the steam is executed in the simulator. So with adjustments always "10x check. For example, EnableTrigger ( x ) x = the trigger line number within the current groups of Triggers.
DisableTrigger - deactivates a certain trigger (line), as described with EnableTrigger.
Selection Method
The Selection Method command has the following format:
SelectionMethod ( x )
where x= file play method.
The following types of selection method commands are available to use:
SequentialSelection -each sound file is played "alternately" with each activation of the trigger. Naturally if there is only one file, then this will be the only filed played.
RandomSelection - each sound file is played "randomly" with each activation of the trigger.
General Comments
Some general remarks:
- Always make a backup of the original and / or previous
SMS file!! - With triggers, "think like a computer" ... computers are straightforward. If it doesn't work, there is a fallacy or mistake in the stream somewhere .....
- The computer always reads a stream "from top to bottom" (albeit in very fast tempo). If something does not work, think step by step what happens and especially what can happen ... It can often times go wrong with "DisableTrigger and EnableTrigger". In case of doubt, try small steps first, or think in a different order of structure and try again.
- And in some cases of streams, especially if a "sequence" applies. Make it as simple as possible, but also a bit "monkey proof" (no working sounds or at the wrong moments is very unfortunate later)
- And perhaps most importantly, write the streams clearly, so directly below each other, use
space orTAB in the same way and think of the trigger counts. and don't forget the correct numbers "(" and ")" ....... In other words, keep it "clear"!. - It is advisable to always check this with the OR log file after new adjustments in the
SMS file - Always pay close attention to the "(" and ")", the open and close brackets. In other words, every '(' opening must be closed with a ')' ! If these are not balanced then the sounds may not work correctly.
- Make sure through the audio editor that the sound at the beginning and end of the loop is always "proportional", for example "starts and stops in the same direction at 0 point". This often prevents the "clipping / grinding" sound that is heard so often during loop playback.
Key Open Rails Trigger Events for Sounds
The key trigger events in Open Rails that can have a sound attached to them are described in the following table.
 Sound Events (updated Jul 2021)
Example Sound Configurations
In this section some simple sample sound configurations will be provided to help see how it all "comes together".
Each "sound function" (Horn, Bell, Doors open/close, Brakes, etc.) are configured separately in a "Stream". In this way, the sounds can also be used "independently of each other". The composition of the triggers (in a Stream) mainly depends on the function and the available sounds.
Example 1 -
For example when the driver in the cab operates the brakes the following configuration will play a
Stream (
Skip ( **** AirTrainBrake**** )
Priority ( 6 )
Triggers ( 2
Discrete_Trigger ( 14 PlayOneShot ( 1 File ( "TrainBrake1.wav" -1 ) SelectionMethod ( SequentialSelection ) ) )
Discrete_Trigger ( 54 PlayOneShot ( 1 File ( "TrainBrake2.wav" -1 ) SelectionMethod ( SequentialSelection ) ) )
)
)
In this example: Two Triggers are configured which operate as follows, when Trigger event #14 (Train Brake Pressure Increase) is triggered, the
Example 2 -
Stream (
Skip ( **** Stoker sounds. ****)
Priority ( 5 )
Volume(0.3)
Triggers ( 2
Variable_Trigger ( Variable3_Inc_Past 1 StartLoopRelease ( 1 File ( "fuel_coal.wav" -1 ) SelectionMethod ( SequentialSelection ) ) )
Variable_Trigger ( Variable3_Dec_Past 1 ReleaseLoopRelease () )
)
)
In this example: Two Triggers are configured to provide sounds for the fuel stoker. The first trigger is activated once Variable3 increases beyond a value of 1. The
Example 3 -
Stream (
Priority ( 6 )
Volume ( 0.5 )
Triggers ( 3
Initial_Trigger ( StartLoop ( 1 File ( "fs_power_cruise0.wav" -1 ) SelectionMethod ( SequentialSelection ) ) )
Variable_Trigger ( Speed_Inc_Past 0.1 ReleaseLoopRelease () )
Variable_Trigger ( Speed_Dec_Past 0.1 StartLoop ( 1 File ( "fs_power_cruise0.wav" -1 ) SelectionMethod ( SequentialSelection ) ) )
)
)
In this example: The Initial_Trigger is used to play the
Look here for Advanced Sound Examples. Alternatively, a working example can be found by trying the locomotives which have been set up, and studying their respective sound files. For example, look at the H6a locomotive.
Working with WAV Files
The
Cue points
Cue points (or marker points) can be embedded into a
WAV File Playing Examples
Below are some examples of how
Example: PlayOneShot
The simplest example, a sound
Discrete_Trigger ( 6 PlayOneShot ( 1 File ( "Ding_Dong.wav" -1 ) SelectionMethod ( SequentialSelection ) ) )
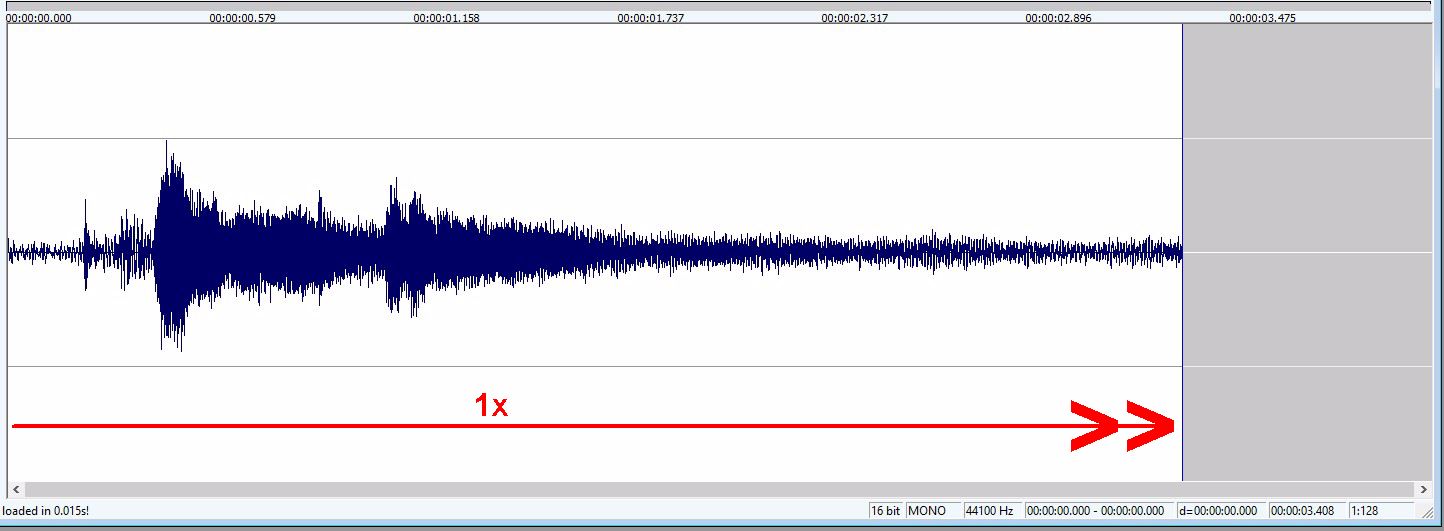
Example: StartLoopRelease (with "start-loop-stop" from 3 xxxxx.wav files)
This method is often used. A sound source can be "cut" in a "Start, loop and Stop" section. When "cutting" in the audio editor, make a good note of the duration (cut point time), so that the files 'connect' well with each other.
If a Stream is made from different sound sources, please note that the
Discrete_Trigger ( 6 PlayOneShot ( 1 File ( "Ventil_1.wav" -1 ) SelectionMethod ( SequentialSelection ) ) ) Start sound in Figure A
Discrete_Trigger ( 6 StartLoopRelease ( 1 File ( "Ventil_2.wav" -1 ) SelectionMethod ( SequentialSelection ) ) ) Start sound in Figure B (When A has ended)
Discrete_Trigger ( 7 ReleaseLoopRelease () ) Stop B (until the end)
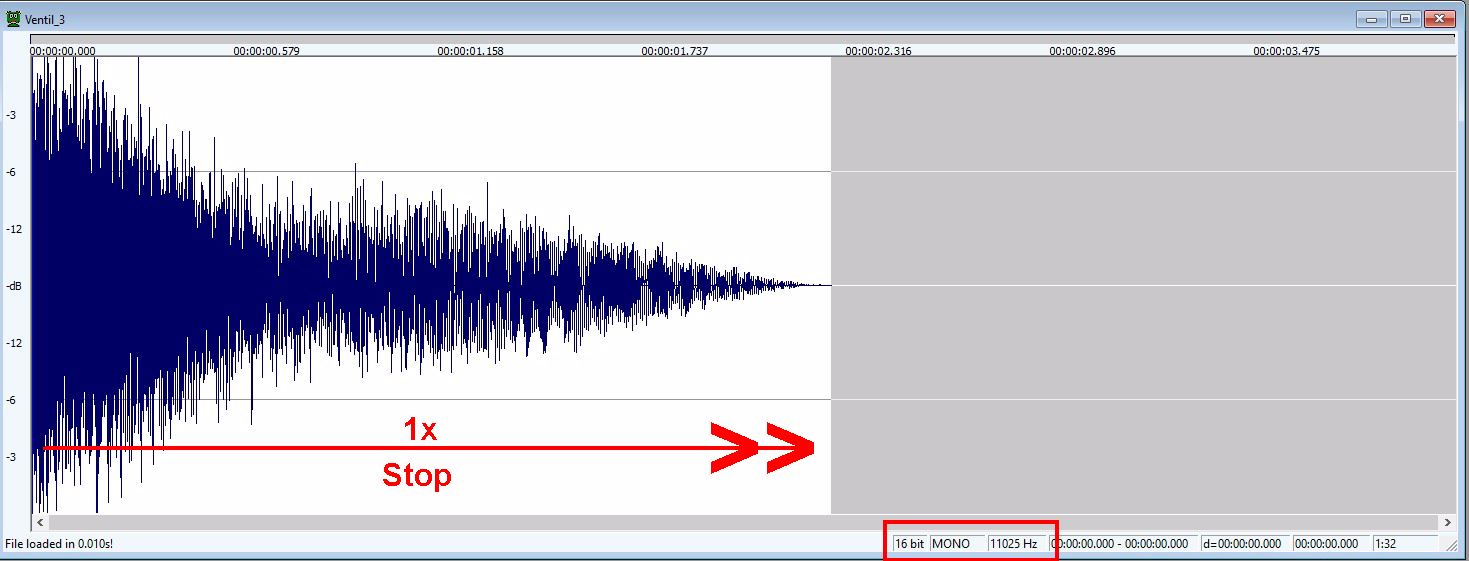
Discrete_Trigger ( 7 PlayOneShot ( 1 File ( "Ventil_3.wav" -1 ) SelectionMethod ( SequentialSelection ) ) ) Start sound in Figure C (When B has ended)
Figure A:
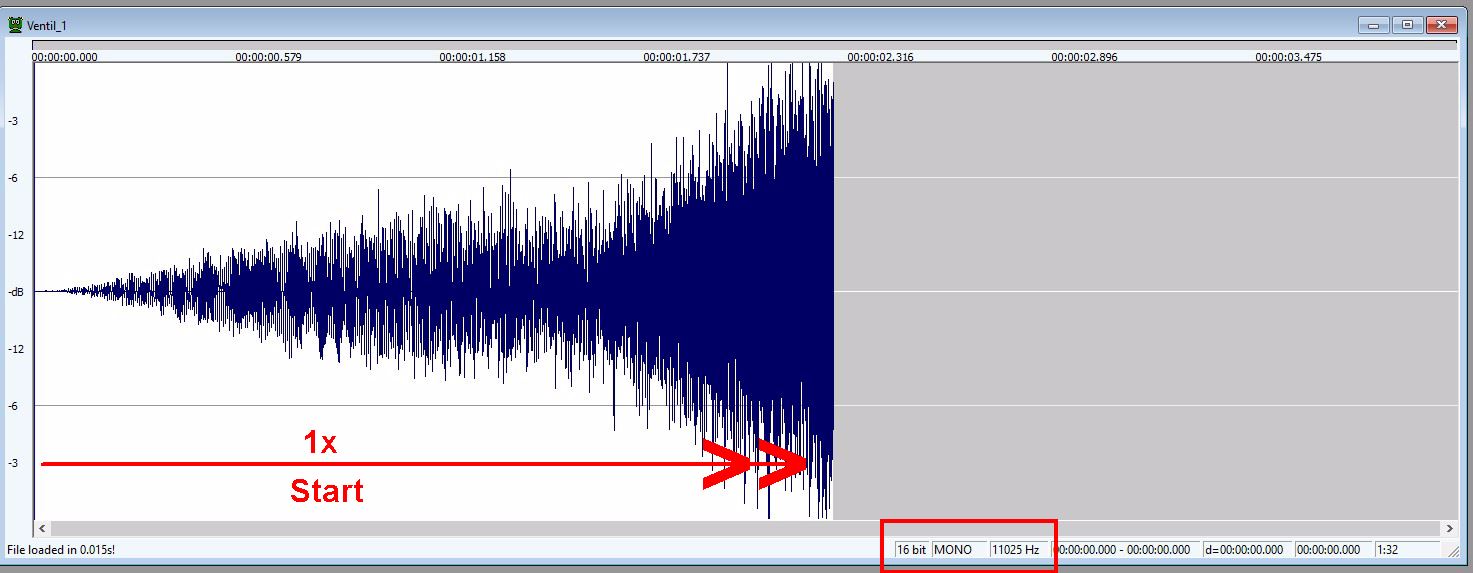
Figure B:
Figure C:
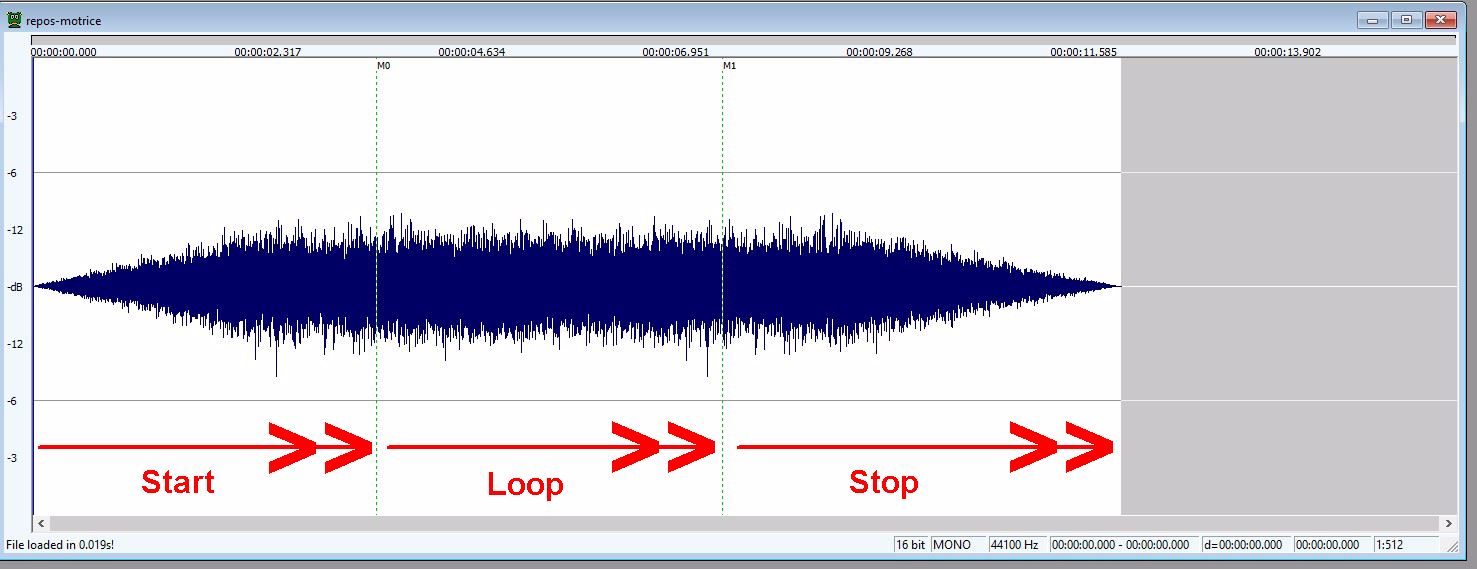
Example: StartLoopRelease (with "start-loop-stop" as marker points within the xxxxx.wav files)
This method can only be applied if the xxxxx.WAV has Marker points (Cue points). Note that this is not (immediately) visible in all audio editors! (a freely available and simple audio editor like Wavosaur works well with this). An additional point of attention is that: Only xxxxx.WAV files with marker points (Cue points) apply the ReleaseLoopReleaseWithJump, otherwise always ReleaseLoopRelease !!!
Discrete_Trigger ( 6 StartLoopRelease ( 1 File ( "repos-motrice.wav" -1 ) SelectionMethod ( SequentialSelection ) ) ) Start from the beginning to "M0", then proceed as Loop between "M0 and M1"
Discrete_Trigger ( 7 ReleaseLoopReleaseWithJump () ) Stops Loop "M0 - M1" and stops to the end
Example: Loop xxxxx.WAV
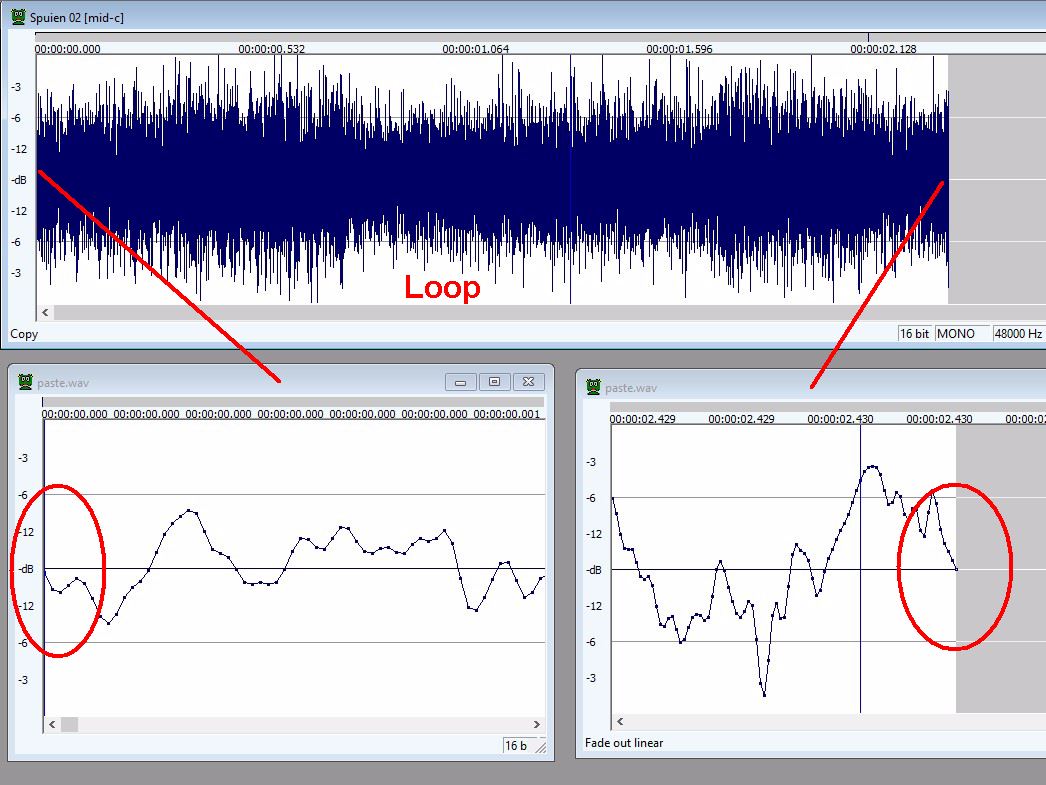
If you make a "loop xxxxx.WAV", you do this in an audio editor by marking a part of the sound and playing it simultaneously as a "loop function". By shifting the starting point and end point, you try to get the best result. Record the start and end times (usually needed as the start and end points of the "start and stop" sounds). It is often possible that "the loop sound" in itself sounds good, but an annoying "click" is heard. Try to remove it, it can be very annoying in the simulator!
The "click" is because the end does not correspond 100% to the starting point. You can fix this by increasing the sound file and going to the start and end point. Try to cut the sound "to the zero line" and make sure the sound goes "in the same direction". (so end point flows through to start point). This removes "clicking" and gives you a good Loop sound.
If the above fails, you can also try using the "Fade-in" and "Fade-out" on the first / last sound points. (not too big part, otherwise this is audible as a "dip" ....)
Similarly, you can also edit the "linked sounds" (such as Start and Stop sounds), if it appears in the simulator that they also "click" when playing.
Example: "Clipping" sound
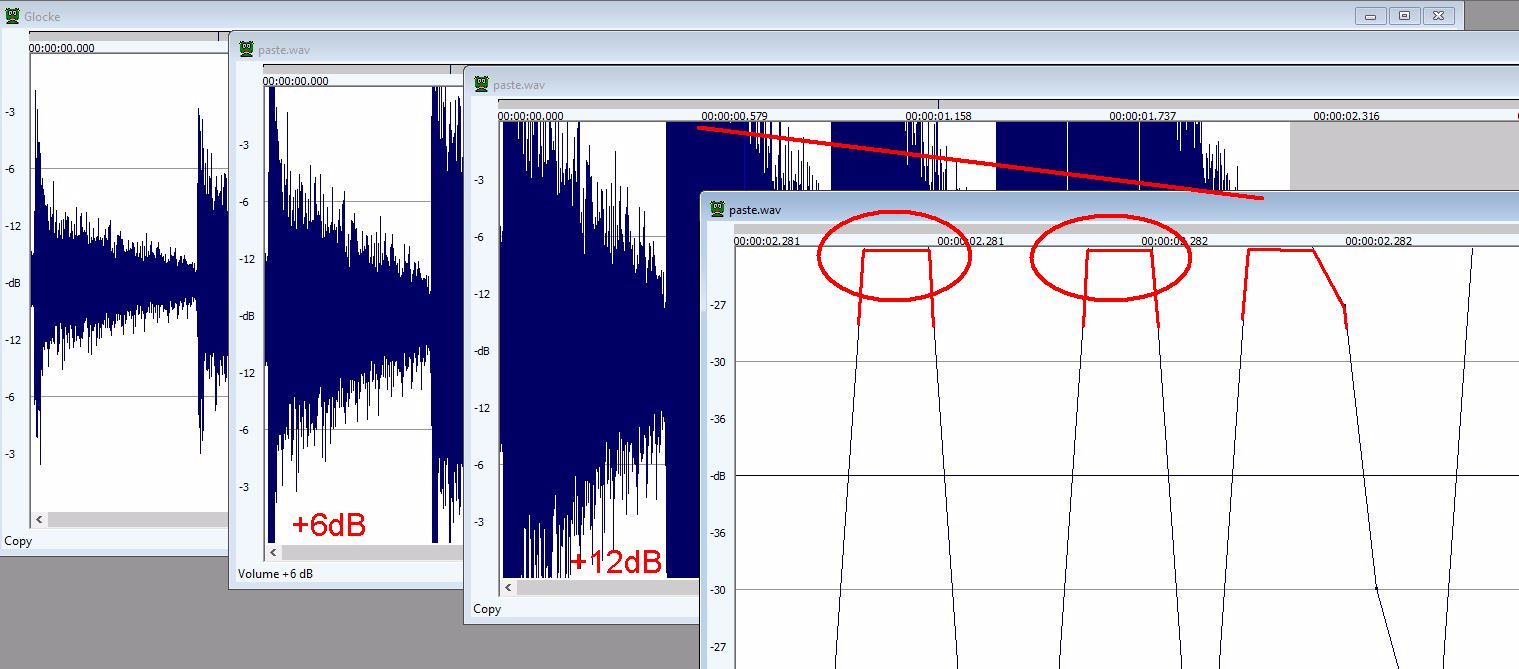
If you want to increase the volume of a sound, make sure you don't do this "too much". It depends a bit on the type of sound, but when "the top level become flat" a "tinny, cracking" sound is created. Do the volume increase in small steps of + 3dB or better smaller values. (And test each sound again or it is not 'deformed').
Usually this is only audible what is 'right or wrong', but the above also makes it partly visible.
Troubleshooting and Debugging
General
The "Sound Debug tool" is a nice tool when working with sound files. The Sound Debug tool is standard in OR. If you start Openrails (ORTS) with "Play" with your locomotive (consist), you will enter the simulator. As 'normal' you can then run the train, etc.
It is highly recommended to use a "empty" route without too much object, such as the Coals to Newcastle test route. This is because the sound debug monitor requires a lot of performance capability.
During the simulation in OR you start the Sound Debug tool by using the key combination
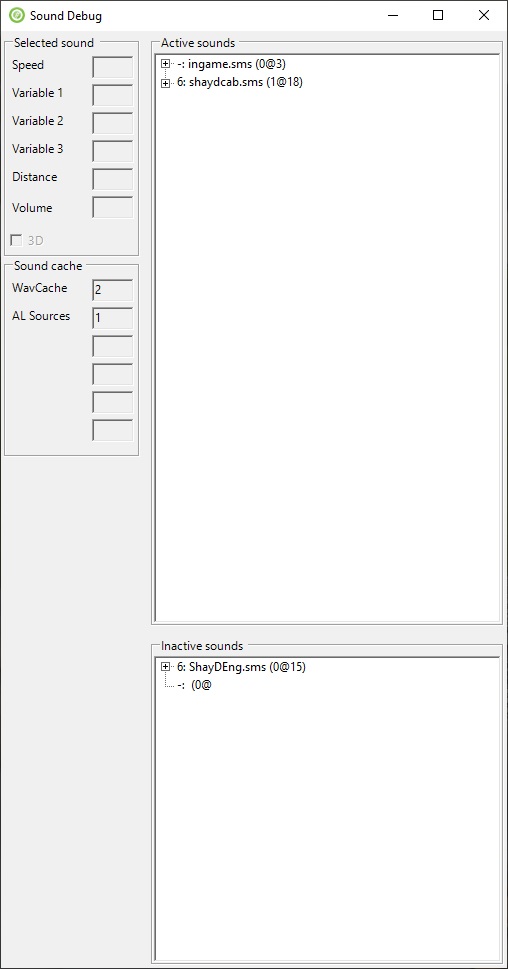
As can be seen in the above screenshot information is displayed in four areas on the Sound Debug tool. Each of these areas will be described in more detail below.
Active / Inactive Windows
In the large field you see all the "active"
In the small field at the bottom right you see the "inactive"
An example of how the information could be displayed in the active/inactive windows is described as follows.
A locomotive has a
If you open the
For example, if you switch from cabview to external
Make sure you open the correct
If an
The
- A typing error may be present in the
SMS file incorrectly referencing theWAV file - The
WAV file may not present in the/SOUND folder, or the path in question is incorrect? - The Stream in question has turned off the volume [Stream Volume = 0.0, etc.]
Using 'the status' you can also see how a Stream in the
- Always try a (new) Stream first if it really works .... (Theory is true with practice)
- For Streams such as "engine sounds", "braking", etc., try these several times with various 'test drives'. (often 'mistakes' become visible ...)
You will also see the "other
Variable Data Window
Another help in Sound Debug, for both checking and setting in Streams, is the variable data on the left. These data are the values used for the "Variable_trigger" in a Stream, with the increase and decrease variables of:
- Speed
- Variable 1
- Variable 2
- Variable 3
- Distance
Because it is often not 100% known which "unit" is needed, or the calculated value, or the difference in which situation (steam, diesel, electric), the simplest way is: Make various test drives in various conditions, and check the values you see in the Sound Debug tool. This allows you to tune the Stream (and thus the sounds).
(- Volume is theSound Cache Window
WAV Cache: Every sound that is played is stored (for a certain time) in Cache. Cache ensures that sounds can be started "with less delay". This is only an information field that shows how many (played) files are 'stored in Cache'. (possibly an item for research into performance problems).
AL Sources: This is only an information field that shows the current number of sources (actually directory sources) where the .WAV sounds come from. (possibly an item for research into performance problems).
Problem Solving
With the Sound Debug as a tool you can already check most errors with sounds (