Open Rails Function Testing
Aim - Open Rails has a number of different functions or features that can be configured in the ENG or WAG file, including steam effects, lighting and load variation, etc. Once the ENG and WAG file(s) have been built for a locomotive, or a wagon, they should be tested. The following tests will ensure some level of realism is achieved with the physics as set. The use of the CTN test route will ensure commonality and consistency between different testers and will provide a common test environment for all.
If you wish to provide any feedback or suggest corrections, please use the Contact page. Please provide appropriate references.
Index
Introduction
The following tests are based upon the use of the test route and either the test rolling stock or alternatively stock that has been correctly configured and tested by the user.
If you wish to provide any feedback on these test, please use the contact page.
When operating these tests it is recommended that the following Open Rails Options are selected in the Options Menu:
- Break couplers - (Simulation Menu) when select allows couplers to break if coupler force exceed the value set in the WAG and ENG file.
- Steam locomotive hot start - (Simulation Menu) when select allows locomotive to start in a hot state without the need to initially build up steam pressure.
- Curve dependent resistance - (Simulation Menu) adds resistance allowance when train travels around curves.
- Curve dependent speed limit - (Simulation Menu) monitors train speed around curves and warns when speed is being exceeded.
When undertaking these tests, it may be helpful to refer to some of the different "Extnded Heads Up Displays (HUDs), available in Open Rails. These can be accessed by pressing
Before commencing these tests it is suggested that three consists be developed for the locomotive under test, based upon known load tables for the locomotive, as follows:
- Light Engine - Locomotive only (including tenderif applicabe)
- Load_Level - Maximum tabled load for a level track.
- Load_4 - Maximum tabled load for a 1 in 25 (4%) gradient.
Consists for other gradients can be built as well.
Initial Tests
Test Purpose
To test the initial build of the ENG file.
Process
When required, you may need to refer to the extended steam HUD, which may be accessed by pressing
- Run Open Rails in "Explorer" mode, select path called "Outer Loop - NE Station" and select the consist with the test rolling stock in it..
- Check the extended steam HUD to ensure that all the data fields have valid values in them, ie "Not a number (NaN)" does not appear anywhere. Check also that any user entered values appear to be correct.
- Test that the basic controls appear to work correctly, for example, that whistle blows and steam is visible, regulator can be opened, reverser works, etc.
Results
Key outcomes to note from your test:
- All basic locomotive controls should work.
Brake Tests
Test Activities
The following test activities demonstrate the use of the brake settings described on the brakes page. You can insert your own consists if you wish to see how your own settings perform.
Introduction
When a train or vehicle is moving it possesses energy by reason of its motion, the amount of which is proportional to the square of its speed. In order that the vehicle or train may be brought to rest, it is necessary that almost the whole of this energy must be destroyed or dissipated by the brake shoes.
Therefore the distance required by the train or vehicle to stop will also vary as the square of the speed. For example a train travelling at 40 m.p.h. will require approximately four times the distance to stop as compared with one travelling at 20 m.p.h. and at 70 m.p.h. would require approximately twice the distance as at 50 m.p.h.
As a general rule a train may be stopped by the action of air brake at a rate considerably faster than it can be accelerated from rest with the motive power provided. Tests carried out locally (in NSWGR) have shown that a train weighing 308 tons may be stopped on level track in 42 seconds from a speed of 70 m.p.h.
Test Suggestions
After adjusting the brake parameters in rolling stock, a series of tests should be undertaken to ensure that the brakes are performing correctly. For some suggested setting of brake parameters in the ENG or WAG files, refer to brakes page.
The performance of the following braking tests is suggested to confirm the correct operation of the brakes in Open Rails:
- Test 1 - a stationary test to confirm that the train brakes are releasing and applying in realistic fashion.
- Test 2 - a series of tests at different speeds to confirm the stopping ability under a full brake application and an emergency application
- Test 3 - a test to test the ability of the locomotive driver to control the train down a steep hill.
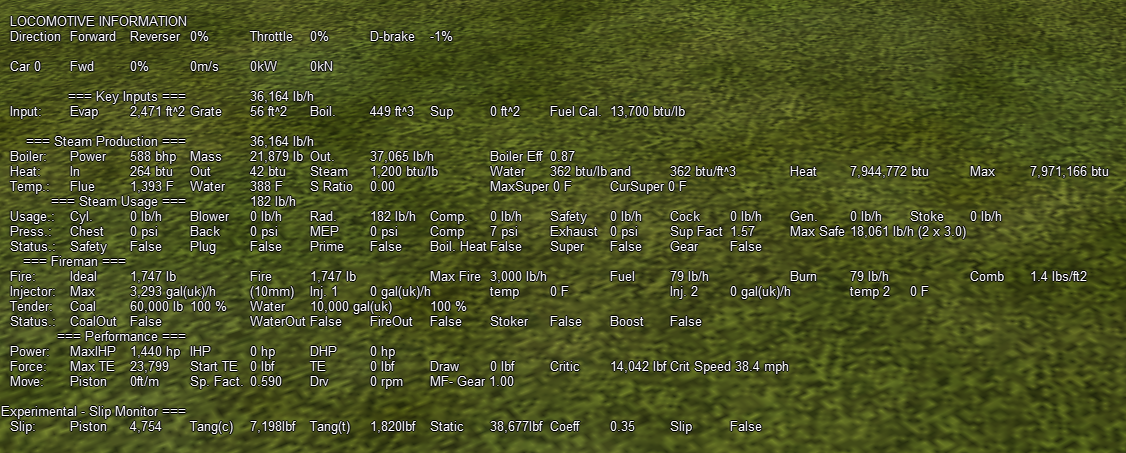
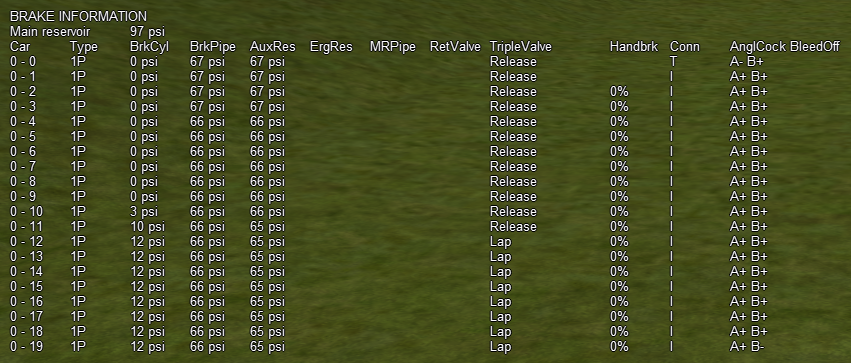
When testing the brakes, it is useful to see the operating information about the brakes, this can be access by using the extended Brake HUD. To access press
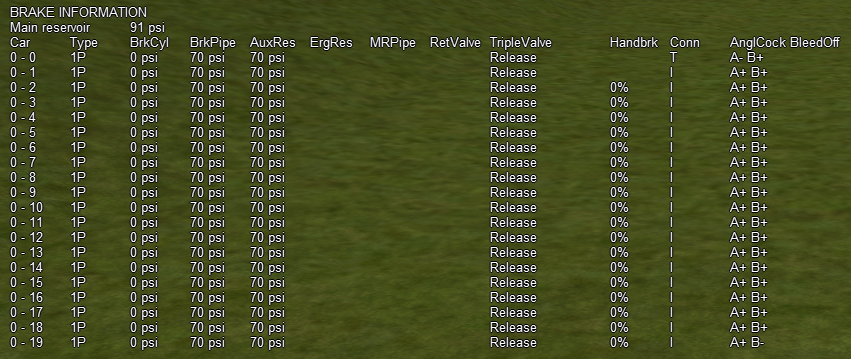
Items to note in the Brake HUD screen:
- Main reservoir - pressure in main reservoir on the locomotive.
- BrkCyl - Brake cylinder pressure
- BrkPipe - Brake line pressure
- AuxRes - Auxiliary reservoir pressure
- ErgRes - Emergency reservoir pressure
- TripleValve - Lap, release, etc.
- Handbrk - Handbrake status. Blank means no handbrake fitted.
Test 1 - Brake Release and Application - Stationary train
Test Purpose
To test that the train brakes release smoothly and consistently along the whole train, in a realistic period of time. For this test you will be at a standing start, release the brakes, and in the Brake HUD (Press
Test Process
- Start Open Rails and untick "Graduated Brake Release" in option menu.
- Run Open Rails in "Explorer" mode, select path called "Outer Loop - NE Station" and select the consist with the test rolling stock in it.
- Go to brake view in extended HUD (
Shft-F5 ) - Apply brakes (Full Service), and then release brakes.
Test Results
Watch the extended brake HUD as you release the brakes.
Points to note as the train brakes release:
- Time for the brakes to release - approximate time for the brakes to release 1 second per 5 (4 wheel) wagons.
- Brake cylinder pressure should drop, and the state change to "release" in an even manner from the front of the train to the rear. If this is not the case, then wagons that take longer to release then surrounding stock may need their braking parameters checked.
Once the above test is completed successfully, try applying the brakes and ensure that a similar ripple effect is seem as the brakes apply on each wagon.
Test 2 - Brake Application - Stopping from Speed - Full Service application and emergency application
Purpose
To test that the train can be braked to a stop in a realistic period of time from high speed. Run the train up to speed (70 mph) and see how long it takes to stop the train at speed.
Full Brake Application - is dropping the brake pipe pressure from its normal pressure, say 70psi, to 50psi in order to achieve a full pressure application in the brake cylinder. Usually this will be done by using the "Full Service" controller setting.
Emergency Brake Application - is dropping the bake pipe pressure completely, to achieve a faster brake application. Usually this will be done by using the "Full Service" controller setting. The results of this may vary depending upon the brake configuration, and type, eg whether it has an emergency reservoir, etc.
Process
- Run Open Rails in "Explorer" mode, select path called "Outer Loop - NE Station" and select the consist with the test rolling stock in it.
- Start the train and get run upto the test speed.
- When you reach the desired speed, put apply a full service or emergency application depending upoin the test being undertaken.
Results
Points to note as you stop your train:
- Note the time and distance required to stop the train - repeat the test for various speeds, and either full or emergency brake applications.
Test 3 - Controlled Brake Application Down Hill
Purpose
When travelling down a hill with a large load it is important to set the brakes carefully and not be having to apply and release them continuously, as this may exhaust your air supply, which could result in a runaway train.
This test checks that the train can be safely controlled down a steep hill.
Process
- Run Open Rails in "Explorer" mode, select path called "Top Station - 25 - Brake" and select the consist with the test rolling stock in it. (It is recommended that an extra heavy load is used to ensure a reasonable test of the stock, and drivers skill)
- Run train down the hill, try adjusting the brakes slowly so that you maintain the speed at no more then say 30mph as you travel down the hill. It is often more efficient to apply light brake applications early, rather then trying to stop the train once it is going too fast. Continued application and releasing of the brakes will use up valuable air from the main reservoir, and could leave the driver without air for the brakes.
Results
Points to note as you travel down the hill:
- Note the reservoir pressure, as this will be an indication that you still have sufficient air in your brake system.
- Note the brake hud, as this will be an indication of the status and amount of brake force applied to the train.
Steaming Test
Test Purpose
Is a basic test to check the performance of the steam and force generation capability of the steam locomotive when running on a long level track. More detailed steaming performance tests are described on the Steam Locomotive Performance Testing page.
Process
When required, you may need to refer to the extended steam HUD, which may be accessed by pressing
- Run Open Rails in "Explorer" mode, select path called "Outer Loop - NE Station" and consist "Load_Level".
- Commence driving your locomotive. Try driving the locomotive with different regulator and reverser settings, and at the same time note the impact on these changing values in the extended steam HUD.
Results
Key values to note as you travel:
- Heat - for best performance of the locomotive, In (Heat In) should always exceed Out (Heat Out). Max (Heat Max) is the approximate heat value when the safety valve should blow. Heat (Heat Heat) is the current total heat in the boiler.
- Steam - watch steam usage and production to ensure that steam usage does not exceed steam production for long periods of time, as this will result in reduced boiler pressure. Refer to the Steam and Water Usage calculator for steam usage estimates.
- Fire - Fire (Fire Fire) is the current fire mass on the grate, and should ideally always equal the Ideal (Fire Ideal).
- Water - watch the water level. Watch to ensure that water injectors are working correctly. Refer to the Steam and Water Usage calculator for water usage estimates.
- Tender - keep an eye on the coal and water supplies in the tender.
- Crit Speed - this is the speed at which maximum power will be produced by the locomotive. The locomotive will be able to go faster provided the generated tractive effort is greater then the load.
- TE - Tractive Effort - watch how this varies as the speed of the locomotive increases. Note also the Max TE (maximum tractive effort) and the Start TE (Starting tractive effort).
If you are exceeding any of the above values, you may need to check your input values, or alternatively drive with lower regulator or reverser settings.
Load Tests
Standing Start
Test Purpose
Steam locomotives may "slip" if full throttle (and reverser) are applied when they are on a level track, heavily loaded, and under certain weather conditions, for example when track is wet or icy. Note, it is not considered good driving practice to drive the locomotive into slip, the purpose of this test is to check the adhesion performance of the locomotive.
Process
To perform test do following steps:
- Set up a consist with the locomotive to be tested and appropriate load.
- Start Open Rails under "Clear" weather conditions, and select "Explorer" mode.
- Select the relevant consist and starting point, in this case "Bottom Station" is probably the best.
- Apply full throttle and reverser.
- Check if slippage occurs. Under normal conditions most steam locomotives should not experience slippage when starting.
- Restart Open Rails under "Rain" or "Snowing" weather conditions, and select "Explorer" mode.
- Apply full throttle and reverser.
- Check if slippage occurs. Under these conditions some steam locomotives will experience slippage when starting.
- Reduce throttle setting until slip stops and then "start" the train normally. The application of "Sand" may be required if train has a heavy load.
Results
If excessive slip is identified, check ENG file as appropriate (typically the Drive Wheel weight maybe incorrect) and repeat the test.
Hauling Load up Gradient
Test Purpose
Locomotive will climb a gradient as indicated in the load table figures published by the relevant Railway Organisation NSWGR, VR, SAR etc.
Note: If figures are provided at diferent gradients then choose an appropriate path on the test route.
Process
To perform test do following steps:
- Set up a consist with test locomotive and appropriate load (as in sample above).
- Start Open Rails and select "Explorer" mode.
- Select the relevant consist and starting point, in this case "Bottom Station" is probably the best.
- Start train and commence climbing hill (NB You may need to change the points depending upon the path you wish to follow.
- Ensure train is able to climb hill @ speed indicated in load tables. Ideally train should not exibit any slippage unless track is wet or excessive power is applied too quickly.
Results
Adjust ENG or consist file as needed and repeat the test.
Sample NSWGR Information
This information has been extracted from various NSWGR publications, some of which may be found in the NSWGR Documents Section.
- D50 Class locomotive - maximum load and speed on 1 in 40 grade - 340 tons at a constant speed of 7 mph.
- 40 Class locomotive - maximum load and speed on 1 in 40 grade - 400 tons at a constant speed of 15 mph.
- Steam Train Starting - After ensuring all brakes are released, open regulator sufficiently to lift the train; care should be exercised to prevent slipping, do not open regulator too wide before engine has gathered speed. If slipping does occur, the regulator should be eased and if necessary, sand applied.